Gang,
I thought it would be beneficial to outline, in clear fashion (as we've nicely tarnished the syllabus schedule by now), what will occur in the final weeks leading up to Digital Media 1's finale.
Week 12 (Done)
4.22 - Week 13
+SIX presentations.
+An in-depth look into projects 6 and 7. The 3D world (modeling, avatars) can be complex. You will be assisted. The primary plan : Attack interfaces "Blender" and "Second Life".
+Screen a section (time pending) of the PBS special film Digital Nation.
+Use rest of time to work! Classes may start ending earlier towards the conclusion of semester.
4.29 - Week 14
+Discuss the final reading (The New Aesthetic).
+Take trip to the Dynamic Media Lab to each use a computer (some may have to remain in Digital Media Lab) in getting feet wet with Second Life. Again, using more time to work.
5.6 - Week 15
+CRITIQUE PROJECT 6.
+Use rest of time to work!
5.13 [SPECIAL TIME, 10:15 AM] - Final Meeting
+Meet in Second Life's virtual world.
+CRITIQUE PROJECT 7.
+Observe extra credit works.
And then... Game over.
Monday, April 8, 2013

Monday, March 25, 2013
The Postproduction LIST
Hey gang.
Here are the orders we decided (and decided for others) in the class. Of sections to make individual clips out of for the collaboration that is Project 5.
1. Patrick
2. Megan
3. Autumn
4. Sam
5. Elizabeth
6. Kenny
7. Chelsea
8. Jackie
9. Jeannie
10. Lauren
11. Crystal
12. Nick
13. Kristen
14. Michelle
15. Mikki
16. Mickey
17. Richard
18. Scott
Collaborating with the person before and after, I believe, will prove most relevant AFTER screening the progress of next week. So no need until then.
-B
Here are the orders we decided (and decided for others) in the class. Of sections to make individual clips out of for the collaboration that is Project 5.
1. Patrick
2. Megan
3. Autumn
4. Sam
5. Elizabeth
6. Kenny
7. Chelsea
8. Jackie
9. Jeannie
10. Lauren
11. Crystal
12. Nick
13. Kristen
14. Michelle
15. Mikki
16. Mickey
17. Richard
18. Scott
Collaborating with the person before and after, I believe, will prove most relevant AFTER screening the progress of next week. So no need until then.
-B
Sunday, March 10, 2013
Project 5 : Postproduction (Found Footage - Reading Crossover)
★ ★ ★ ★
DUE
MARCH 25
-Reading 3 (Section of Nicolas Bourriaud's
Postproduction.) No questions necessary
this time... Because... It is intertwined
with project 5! All about "postproduction".
-Make a 'Top 3' list of sections from the
reading you would be interested in
bringing to life via visuals. We will
discuss reading and assignment
more in class on this day and
assign sections for the project.
APRIL 1 (No joke.)
-First cut of Project 5 done and ready
to show. NO SOUND. Will make sense later.
More to be explained below. Specs and more.
Mentioned in class. COME INTO CLASS WITH FILE.
No need to upload to Blogger just yet.
Mentioned in class. COME INTO CLASS WITH FILE.
No need to upload to Blogger just yet.
APRIL 8
-Final cut of Project 5, still no audio.
A large duration of class shall be
utilized towards editing the sound
of our sections into one cohesive whole,
and making it a final collaborative.
★ ★ ★ ★
WORKSHOP TIMES
Fridays and Sundays until return
from Spring break, 1-4 PM.
Will announce if otherwise.
★ ★ ★ ★
A S S I G N M E N T 5
Postproduction
"Crossover : Reading + Found Footage"
a.k.a. a collaborative short film using existing
internet footage to make a visual representation of
Nicolas Bourriaud's Postproduction.
a.k.a. Frankenfilm
inspiration : https://vimeo.com/groups/foundfootage
reading location : https://docs.google.com/file/d/0B288S_z9geMudnRIcVFLeDYzU00/edit?usp=sharing
reading location : https://docs.google.com/file/d/0B288S_z9geMudnRIcVFLeDYzU00/edit?usp=sharing
★ ★ ★ ★


★ ★ ★ ★
http://archive.org/ (Thousands of existing free-to-edit video. Old time footage!)
http://keepvid.com/ (For taking footage off of a Youtube video.)
http://www.clipconverter.cc/ (A very good one also, for the fact it doesn't need java!)
Plus plenty more aggregates that exist in finding "found footage". Including those which we have possibly gone over in class.
This is an experimental assignment designed only for specific classes such as these. One which combines aesthetic-technical ability with academic study.
It is additionally both collaborative, but subjective to one's visual tastes at the same time. Ultimately, all 18 of your edits shall combine into a stylish, contemporary short film which runs at the 9-9.5 minute range.
You are not to shoot any of your own footage for this assignment. This may come as a relief for some of you possibly. BUT, we are to attack one of the most technical of all aspects when it comes to creating your own time-based work : editing. Essentially, for those any and all familiar with the language of cinema, everything ends on the editing floor. Some even question if the editor ultimately is the 'auteur' of a work of film or video having the final say and composition.
You will be locating any and all video footage you can put your hands on for this assignment in conjunction with a section/paragraph of your choosing (which will be finalized in class post Spring Break) of the reading. There are 18 divisions total and 18 members of our course. Here are the bulletpoints of the assignment below-
★ ★ ★ ★
★ Obtain your section of reading to visualize during the post Spring Break class.
★Your assignment is to be exactly, with no intro or outro credits, 30 SECONDS.
★Edit a visual representation to your paragraph/section using found internet video footage!
★A minimum of 7 cuts and/or transitions must be utilized in the 30 seconds.
★If a person, type of work, place, etc. is read.. strive to recreate it! Ask/look it up if unsure.
★All edits must be Standard Definition (4:3 Ratio; Exported 720x480) (edit upon export).
★All edits will run at 24 FPS (standard cinematic frame rate) (edit this setting upon export).
★Perhaps consult the person going before and/or after you on a proper transition between!
★And surely keeping in mind, we shall discover kinks that will occur along the way.
★INCLUDING... We may actually decide to make use of a single character that exists in each of our edits, which thematically ties each of our edits together even stronger. For our discussion, think of a character pertaining to the reading that has everything to do with the theories involved. We shall see if this is a do-able concept or not.
Once more, this is an experiment designed to not only emphasize the technical aspects of this course's study, but the theory behind what we are all doing.
Last time this experimental project was done (with Nicolas Carr's The Shallows : What the Internet is Doing to Our Brains), the result was mailed to the author and we received appraisal back in response. We shall do the same and send this result to Mr. Carr.
This assignment is laboriously easier, but slightly more mentally intensive. It may also be deceptively simple. In much lesser parameters, I expect a myriad of editing skills you will learn in between now and conclusion. I shall reiterate that all cinema/video ends on the editing room floor. This is a project that will literally begin and end on the editing room floor.
Good luck.
★ ★ ★ ★
Monday, March 4, 2013
Essay (To Write and Present On)
★ ★ ★ ★
S E M E S T E R E S S A Y T O P I C
a.k.a. Topic a Month in Advance
a.k.a. Writing About A Duet of Working Contemporary New Media Artists
a.k.a Presenting on A Duet of Working Contemporary New Media Artists

★ ★ ★ ★
Helpful tool! http://www.wordcounttool.com/
Or you can count by hand.
2) Choose two artists (or artists groups ; collaboratives) from the following websites featuring literally hundreds of artists for you to explore.
http://www.eyebeam.org/people/current
(search through "fellows" and "residents" for hundreds of amazing artists, links to their websites will generally be on their profile pages)
http://userwww.sfsu.edu/~infoarts/links/wilson.artlinks2.html
http://en.wikipedia.org/wiki/Electronic_art
http://rhizome.org/art/
http://www.gamescenes.org/
3) Research your chosen artists. Make sure to record citations of where to find the works, links, etc.
4) Choose ONE representative work from each of your artists for a total of two works to be considered in your paper and presentation - you may choose to include more works by these artists in your visual presentation to the class.
5) Describe, analyze, interpret, compare and contrast the artist’s works, considering broadly their chosen formal and conceptual strategies, being careful to address genre (film, video, performance, interactive art, simulation, game art, etc) in your general analysis of the works. As part of your research, make an attempt to contact both of your artists to ask questions regarding the work. (If you don't hear back from them please note such in your paper and presentation).
Important : You must as well reference readings from the class in considering the works in question. The three available to that point : Walter Benjamin, Video Art, and Postproduction. One or multiple references. Failure to do so gets points deducted. For the paper/blog post, make appropriate citations following standard academic paper guidelines (MLA or Chicago Manual Style).
Please limit your chosen artists/works to those created after 1980 - the only requirement is that the artists are somehow intrinsically involved in the creative use of digital technologies in their works.
The intent here is to give you the opportunity to critically engage in basic research and analysis of artists and artworks while at the same time encouraging a greater depth of experience of various artist’s creative production and contexts.
Here are some online resources to help you in considering how to critique, compare and contrast your chosen artist's works:
http://writingaboutart.org/pages/introduction.html
http://writingcenter.unc.edu/handouts/comparing-and-contrasting/
http://uwc.utexas.edu/handouts/editing
Grading:
Your presentation and writing will be graded according to the quality of your research, the originality of your analysis, the clarity of your writing, design, and clarity of your presentation.
Important to note, going off a rogue presentation from the previous semester : Stay ON POINT. Your subjective theories about personal practice, as unique as it may be, may have little to do with the essay topic on hand.
★ ★ ★ ★
DUE DATES
(DETERMINED BY LUCK OF THE DRAW IN CLASS.)
(MIND YOU EACH HAS ITS OWN ADVANTAGES, EARLY OR LATER)
ESSAY GROUP ALFA [3.25 / WK10]
1. Autumn
2. Mikki
3. Chelsea
4. Patrick
ESSAY GROUP BRAVO [4.1 / WK11]
1. Nick
2. Mickey
3. Richard
4. Elizabeth
5. Sam
ESSAY GROUP CHARLIE [4.8 / WK12]
1. Lauren
2. Michelle
3. Kristen
4. Scott
5. Crystal
ESSAY GROUP DELTA [4.15 / WK13]
1. Jackie
2. Jeannie
3. Megan
4. Kenny
★ ★ ★ ★
Monday, February 25, 2013
Help, Part 1 : Approaching Video
Hello again!
I am posting for you an extensive walkthrough of the barebones of what you shall need to do in order to complete your project! For now, on the shooting side on things. I did everything myself so hopefully nothing will malfunction on you (or horribly malfunction for that very same reason.)
Do not consider the below as a final word on the method to accomplishing this assignment, but as a solid guide towards achieving your goal! It is very image based to help clarify what needs to be done. Do keep in mind however that it is ultimately on you come into workshops, take notes during class (when you 'are' in class, ahem), and do exploring on your own for the most specific visionary details you predict happening that only you could understand.
Now to begin-
The issue of actually RECORDING VIDEO!
UNR Art Department Media Check-out!
[E-mail me or Dillion, lab tech. We have a system now for check out.]
We have plenty of cameras, tripods, and peripheral equipment ready for checkout! First come first serve basis. Same as the knowledge center.
UNR Knowledge Center A/V Equipment Checkout
http://knowledgecenter.unr.edu/atone/gear.aspx?equiptype=Video
Check out the multimedia area of the UNR Knowledge Center F1/basement (back of the big @One lab) to check out what they have! Use this link and additional tabs for more stuff (such as audio equipment for checkout) to pinpoint what you want. Some items may require on the spot training but its something you gotta deal with. Call ahead of time to make sure it is in stock! And of course, don't bring it in late! They don't like that.
Yourself!
You must have your own device that may be used for disposal for this assignment and the next. Look around. If you feel the need to obtain your own through borrowing or purchase, that's your decision.
Now a brief run through of common methods.
SHOOTING video varies from device to device, though each on its own is very intuitive to harness control of in that aspect. If you feel overwhelmed, do not hesitate to address myself or Dillon.
Capturing media also very much varies, but we can begin here visually are it relates to editing the video. I have done two very quick graphics to explain. CLICK TO ENLARGE.




I am posting for you an extensive walkthrough of the barebones of what you shall need to do in order to complete your project! For now, on the shooting side on things. I did everything myself so hopefully nothing will malfunction on you (or horribly malfunction for that very same reason.)
Do not consider the below as a final word on the method to accomplishing this assignment, but as a solid guide towards achieving your goal! It is very image based to help clarify what needs to be done. Do keep in mind however that it is ultimately on you come into workshops, take notes during class (when you 'are' in class, ahem), and do exploring on your own for the most specific visionary details you predict happening that only you could understand.
Now to begin-
The issue of actually RECORDING VIDEO!
UNR Art Department Media Check-out!
[E-mail me or Dillion, lab tech. We have a system now for check out.]
We have plenty of cameras, tripods, and peripheral equipment ready for checkout! First come first serve basis. Same as the knowledge center.
UNR Knowledge Center A/V Equipment Checkout
http://knowledgecenter.unr.edu/atone/gear.aspx?equiptype=Video
Check out the multimedia area of the UNR Knowledge Center F1/basement (back of the big @One lab) to check out what they have! Use this link and additional tabs for more stuff (such as audio equipment for checkout) to pinpoint what you want. Some items may require on the spot training but its something you gotta deal with. Call ahead of time to make sure it is in stock! And of course, don't bring it in late! They don't like that.
Yourself!
You must have your own device that may be used for disposal for this assignment and the next. Look around. If you feel the need to obtain your own through borrowing or purchase, that's your decision.
Now a brief run through of common methods.
SHOOTING video varies from device to device, though each on its own is very intuitive to harness control of in that aspect. If you feel overwhelmed, do not hesitate to address myself or Dillon.
Capturing media also very much varies, but we can begin here visually are it relates to editing the video. I have done two very quick graphics to explain. CLICK TO ENLARGE.


The manner of recording on each device varies
from data on the actual device drive, a memory
card, a cassette, or otherwise. Important to know
what you're dealing with there. Often a breeze.

Find this application if you're importing most
material. Oftentimes you'll have to (per image
caption) with a video camera go through LOG
AND TRANSFER/CAPTURE from the FILE
menu on Final Cut Pro to get off card/cassette.
For a typical iDevice or [video] SLR camera- this.

You'll typically find a screen like this. Select
your device and select the .MOV (or movie file)
you want to import from your device into a
certain folder. In this image, I am importing
that video we shot in class of myself impersonating
Vito Acconci from my iPhone 4S onto the Desktop.

Viola. A brand new video file. Get
ready to import it into Final Cut Pro for use.
More if you have multiple shots.

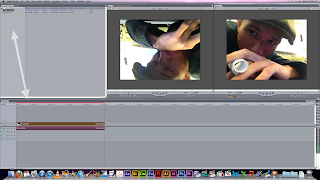
A master runthrough of the FCP interface.
Beyond this explanation, it should be easier
to intuitively figure out the tools involved.

Start off by importing that video file into FCP!
FILE -> Import -> Files. Sometimes FOLDER
if you have just a ton of files. For now FILES.

We're in the system now. Our file is
in the BROWSER. It can be dragged
down onto the timeline for editing.

Drag and drop. That simple. Top bars above the
equator line are VIDEO and the bottom is VIDEO.
Note how we're looking at Vito/me on the viewer
and canvas. I have the file selected from the browser
and am viewing that on the viewer. However, the
video is on the timeline and the scrubber is over
a part of it so we are viewing it. The reason the base
file is upside down is because I may have shot it
upside down. I fixed it through a tool called "rotate"
within the viewer menu. If you shoot properly like
I didn't, that shouldn't be necessary to do.

What you'll do now (and everytime there
is RED on the video or audio) is SEQUENCE ->
Render Selection -> Both. This is so you
can play video back and actually see what
you are doing.

One problem though : Our video may look nothing
like Vito Acconci effect wise, even though I'm
slouched down and slurring at the camera like him.
Lets browse EFFECTS. It is up to you ultimately
to decipher which of the effects that will benefit you.
Once you have added an effect, it can be modified
through the viewer on its own tab.

This one's a freebee. Look at the image to find
out where Desaturate is. Some of you may be utilizing
this as lots of the UBU videos are black and white.
The reason why both the viewer and canvas are B&W
is that I have double clicked on the video WHILE it is
on the timeline, so now the 'viewer' is looking at that
instead of the video file from the browser (the raw file).

Now its a process of adding more effects. Look
at the viewer side and see how you can modify
effects. It's literally like Photoshop, just as a
video editing exercise. Again, decipher what
effects you'll need for your OWN videos.

Lets look at little more closely at the TOOLBAR.
Say I wanna hack off that unrendered end of my
video because I started too late, rushed the project,
and generally don't care. Look below...

1. Select the blade tool.
Cut on the timeline to
divide video and/or audio!
Tip : Align scrubber to where
you wanna cut for a fine cut.
2. Select move tool again.
Just to see its separate.
3. Have cut off end selected and
then DELETE or COMMAND+X
to get rid of it. Now its gone!

If you're interested in special transitions
between clips and at the ends of clips,
use this! For instance, you can find "CROSS
DISSOLVE" and fade into/from black.

KEYS : I and O are key. When ready to export video,
hit I when scrubber is at beginning of your video to
have an "IN" point. O likewise at the end, as an "OUT" point.
Make sure you're on the timeline when you do this.

FILE -> EXPORT ->
Using Quicktime Conversion

You should get an interface like this.
Don't SAVE (export) quite yet. You need
to go to OPTIONS besides QT Movie.

You'll get to this now. The next three images
will be selecting these in THIS order-
Video : Settings.
Video : Size.
Audio : Settings.

The only things you should change on this
is scrub Quality to BEST.

Video : Size. It varies. We clearly have standard ratio
[4:3] here so export on the left dimensions. If you
have a high quality widescreen, export w/ right settings.

Audio : Best. NOW GO BACK TO
THE FILE SAVE SCREEN AND "SAVE".
That means export. It will export your video!
This may/may not take some time. Depending
on your length.

Congratulations. You have a new video file.
TUTORIAL to be continued with burning
a DVD [e-asy] with your video file later.
Subscribe to:
Posts (Atom)